Ableton Live 8, Analog, and Fred Welsh's Synthesizer Cookbook Tutorial
Introduction
Hello, and thanks for visiting my tutorial on how to use the VST Analog to create the sounds in "Welsh's Synthesizer Cookbook". Although sound synthesis has been a hobby of mine for several years, I still consider myself at the beginning of my electronic music journey, and this is the very first tutorial I have ever written. As such, if you find any errors, or if anything I present here is confusing, incomplete, or could otherwise be improved, then please contact me. I welcome your feedback! Now, let's get started :)
Why Build These Sounds?
The beauty of the patches in Fred Welsh's book are their simplicity. All of the sounds use only one filter, one amplifier, one LFO, and no more than two oscillators. This simplicity allows a sound creator to see the principles of what goes into many basic sounds, and mastering those fundamentals provides the building blocks to understand and create more complicated sounds using more complicated synths. This is just one of many important reasons to undertake such a task. After spending many hours studying patches, reverse engineering presets, and building new sounds from scratch, I was absolutely stunned at the sound possibilities that such a simple synth format can offer, especially when combined with a few audio effects - the possibilities are really endless. Also, after going through this tutorial, you will have a much better understanding of the Analog VST, and synthesis is so much more fun when you know your instrument "like the back of your hand".
What I Will Cover & What I Won't
Fred Welsh offers a lot of insight into using harmonic analysis and spectrographs to emulate sounds. He spends nearly half of the first volume of his book talking about it, but in this tutorial, I will only cover how to translate the "cookbook" portion of his book into patches in Analog. Note that in this tutorial I use Live 8 and the first version of Analog that was available when Live 8 was released. At the time of this writing, Analog is now in it's second version. The version of Live is irrelevant for this tutorial, because we will spend all our time in the Analog VST, rather than sequencing notes or arranging a song.
Getting Started - First Patch: Cello
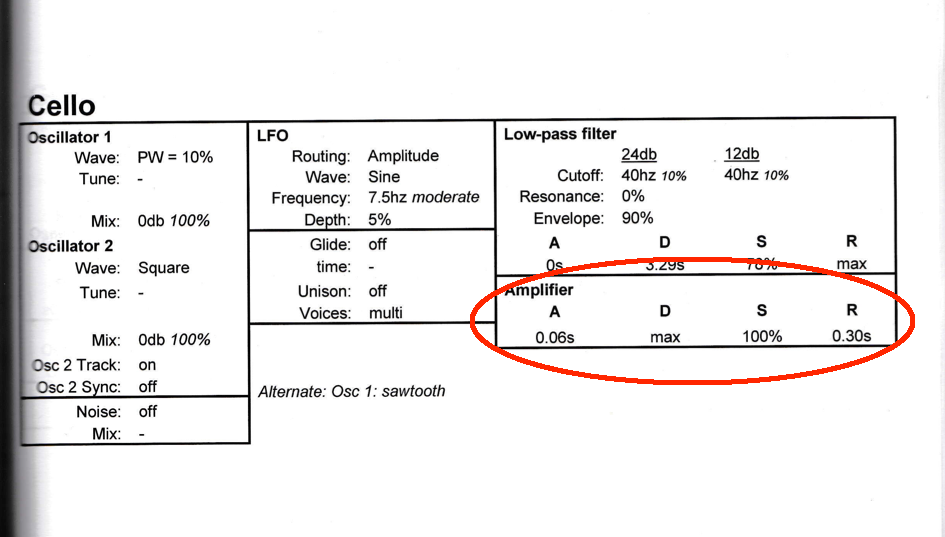
So here's the patch "recipe" for a Cello (pg 53):
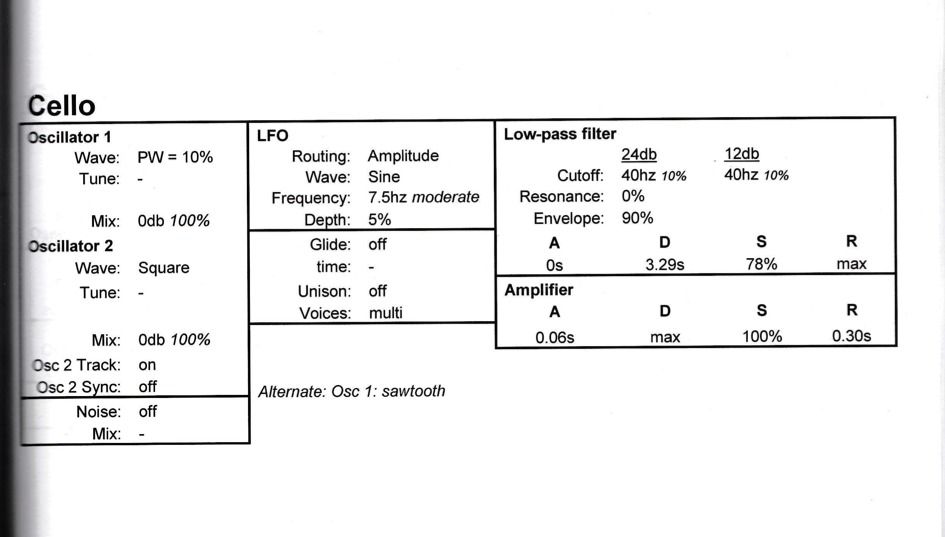
According to this patch, oscillator 1 should be a square wave with a Pulse Width (PW) of 10%:

If you don't know what a square wave with a PW (aka duty cycle) of 10% means, read the beginning of the Fred Welsh book, or if you prefer, you can read about the subject here online:
http://www.soundonsound.com/sos/feb00/articles/synthsecrets.htm
The recipe also tells us that the oscillator has no special tuning (embodied by the "-" after "Tune"). So Osc 1 is tuned exactly to the key we will play on our keyboard, and the recipe says that the volume (aka "Mix" of the oscillator is 0db. Notice that the Oscillator 2 section also says the volume will be at 0db, so both oscillators will be "equally loud".
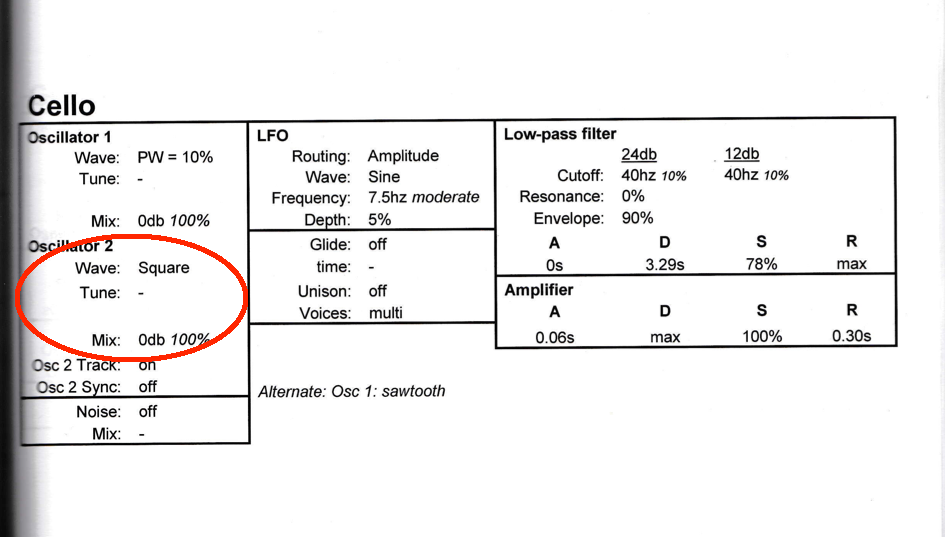
Oscillator 2 is also a square wave, but since no PW value is given, we can assume it is meant to be a perfect square wave. Just below the oscillator 2 section, the parameters for track and sync are given.

Again, if you don't know what track and sync are, go read the Fred Welsh book or look online. Tracking is an easy concept, that just means that every time I hit a higher key on my keyboard, then it will cause the oscillator to have a higher frequency (negative tracking is also possible, and even partial, but that's another topic). The sync concept is more complicated, I will touch on that at another time.
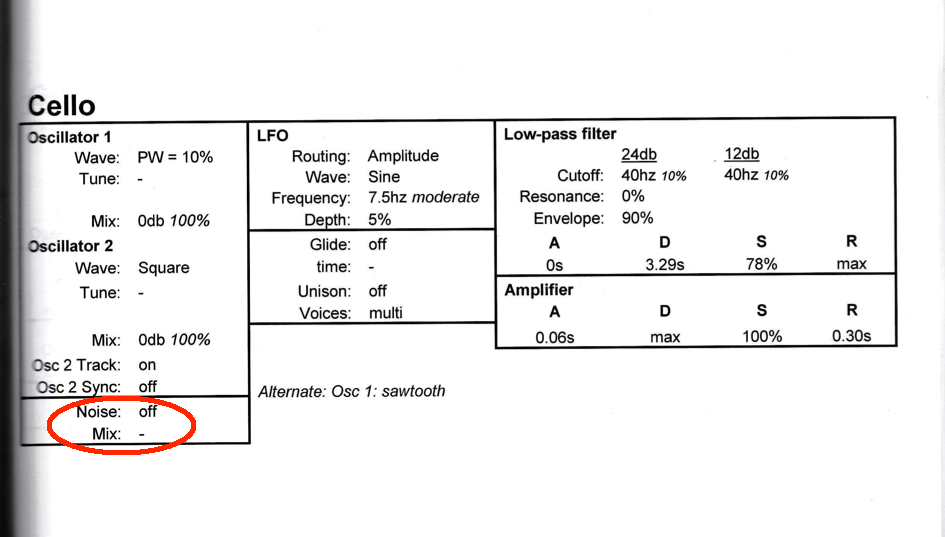
Lastly, in the column that has the oscillator section, is a small box at the bottom that tells us that there is no noise added to the patch:
Okay, so far I have discussed the nuts and bolts of the oscillator column section. Here's a video of me programming the oscillator column into Analog…
We have now programmed the oscillator section of the Cello patch, now we will move on to the LFO column:
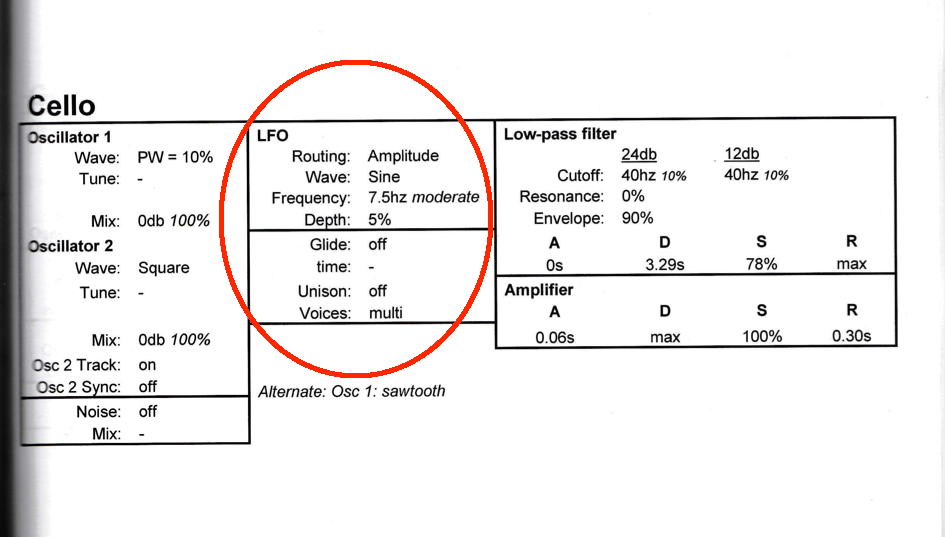
The patch calls for an LFO to be routed so that it modulates the amplitude of the Oscillators. That LFO should have the waveshape of a Sine wave, and it should be at the frequency of 7.5Hz with a depth of 5%:
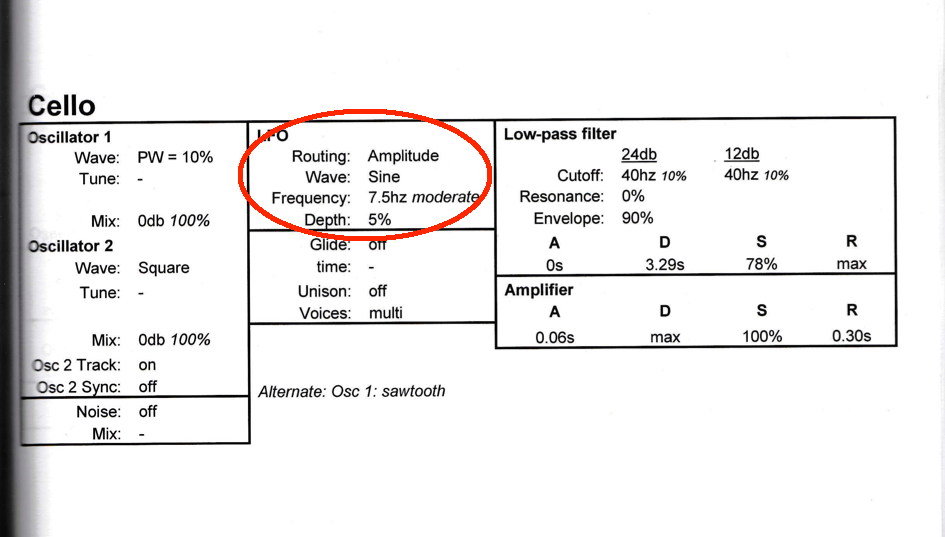
Underneath of that box, is another box that tells us that there shouldn't be any glide between notes, that there are no unison oscillators, and that this is a patch with multiple voices. If any of the terms glide, unison, or voices are unfamiliar, then look on page 49 of the cookbook, and if those explanations aren't enough, then try google. If you still don't find a satisfactory explanation, let me know and I can post a video about those concepts.
So let's program that LFO column into Analog in this video:
So now we are onto the final column that specifies how the filter and amplitude envelopes should affect our oscillators:
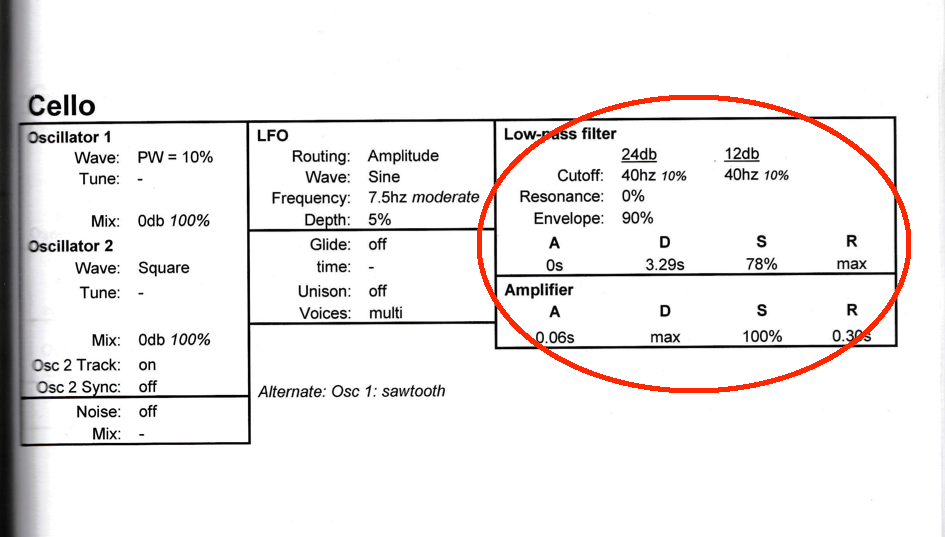
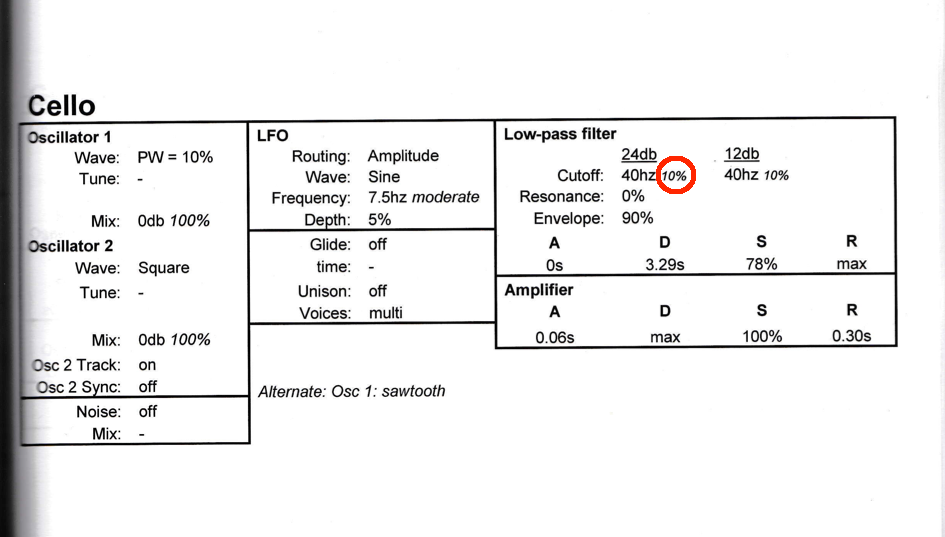
In the Low-pass filter (LPF) box , there are values given for a 24db filter and a 12db filter. We will use the 24db settings.
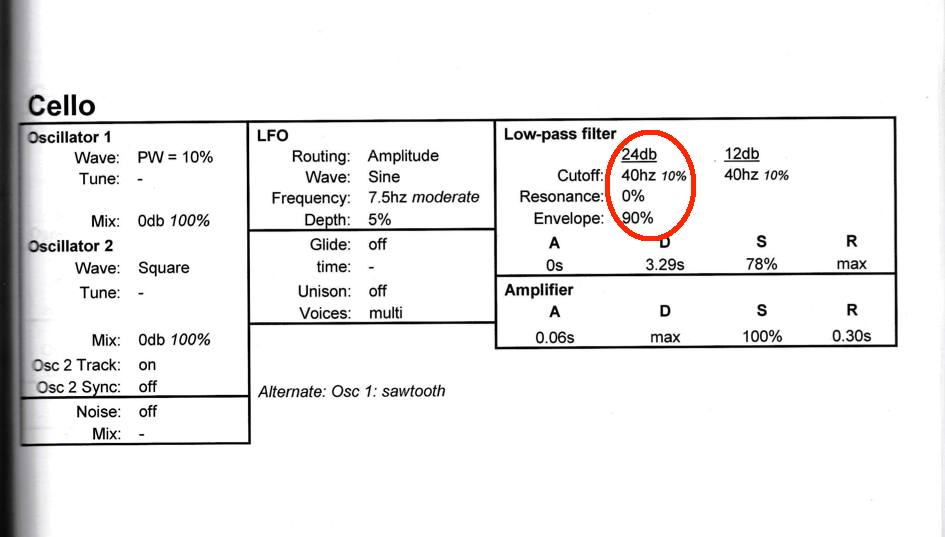
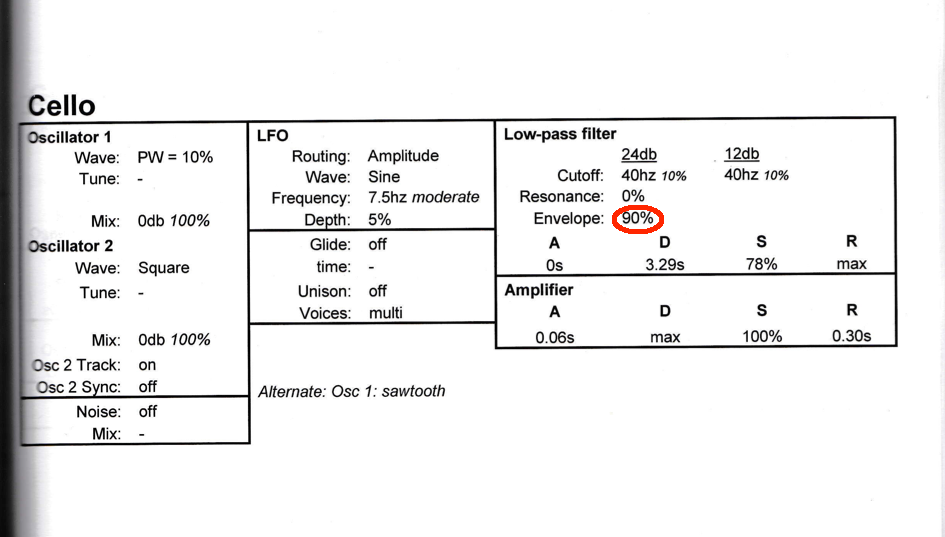
So our 24db LPF will start at a frequency of 40hz, it will have no resonance, and the envelope will affect the filter's frequency to a degree of 90%. For most people, the frequency of the LPF (aka, it's "Q" value) starting at 40Hz with 0% of resonance is an easy concept to understand, but the tricky parameter is that Envelope at 90%. And then there's that whole 10% number by the 40Hz filter Q value. What does all that mean exactly? I had to write Fred Welsh himself to ask, because I couldn't find an explanation in the book. So, I will explain it to you as it was explained to me by the author...
Let's start by examining the question like this, what exactly does the patch recipe want the filter to do? Some information is readily apparent: start a filter with no resonance at 40hz and have it rise to that enigmatic 90% value. So here's our first difficulty, what's the 90% value? Well, it turns out that what the recipe means by 90% is that the filter should open up to 90% of it's possible capacity, taking into account that it's already open at 10%. Here it get complicated, because not only are we dealing with a 10% figure, but we are also dealing with that 90% number. You might be tempted to just add the two numbers together, and say, well, if we are starting at 10%, and the filter is supposed to open another 90%, then the filter should open up to 100%, (10 + 90 = 100, right?). Unfortunately, it doesn't work like that. First off, the filter's capacity is given in a percentage, but that percentage has an exponential relationship to the filter Q, not a linear one. That sounds complicated, and it is, so let me put it like this…
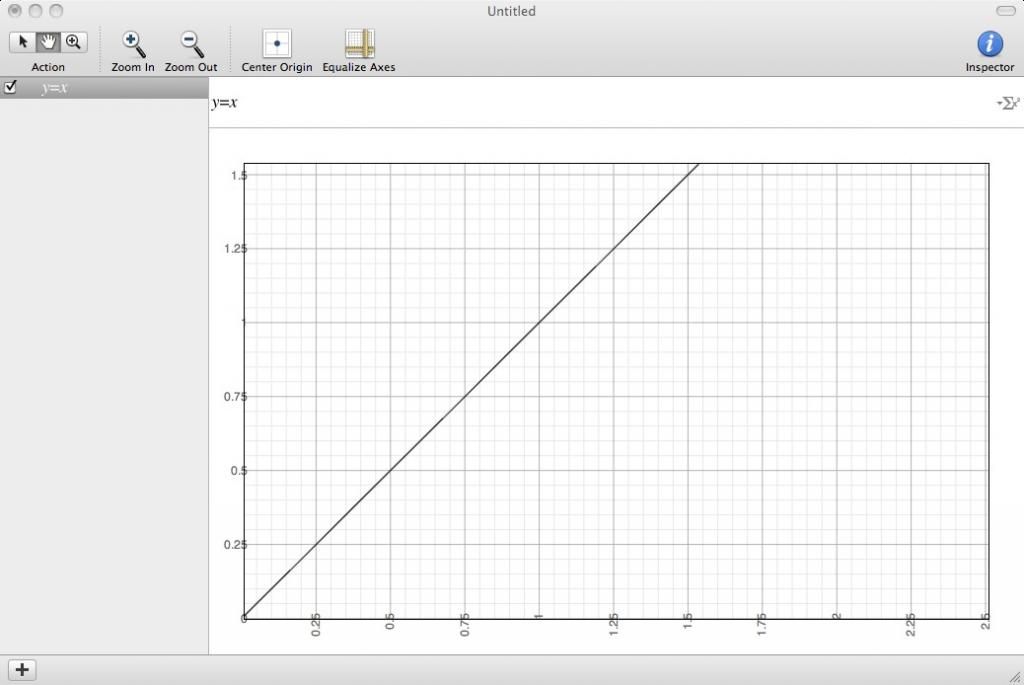
Usually filter Q's can range from 0Hz-20kHz (the average spectral range of human hearing)… so the filter can go between 0 to 20,000Hz. If you take 10% of 20,000 you get 2000 - but look at the patch - the starting point is 40Hz and that is listed as 10%. Why the difference? It's because the scale that's measuring the filter Q isn't linear, it's exponential. Changes in a linear way are different from changes in an exponential way. If you've taken some higher level algebra, you should have come across this concept before, but if you haven't, then it's going to take some time and effort to figure that concept out, and you will have to look into it (I recommend sitting down with a math book or finding a tutor to explain it). But here are two graphs that briefly illustrate the point. The first one is a linear graph…
The second one is an exponential graph:
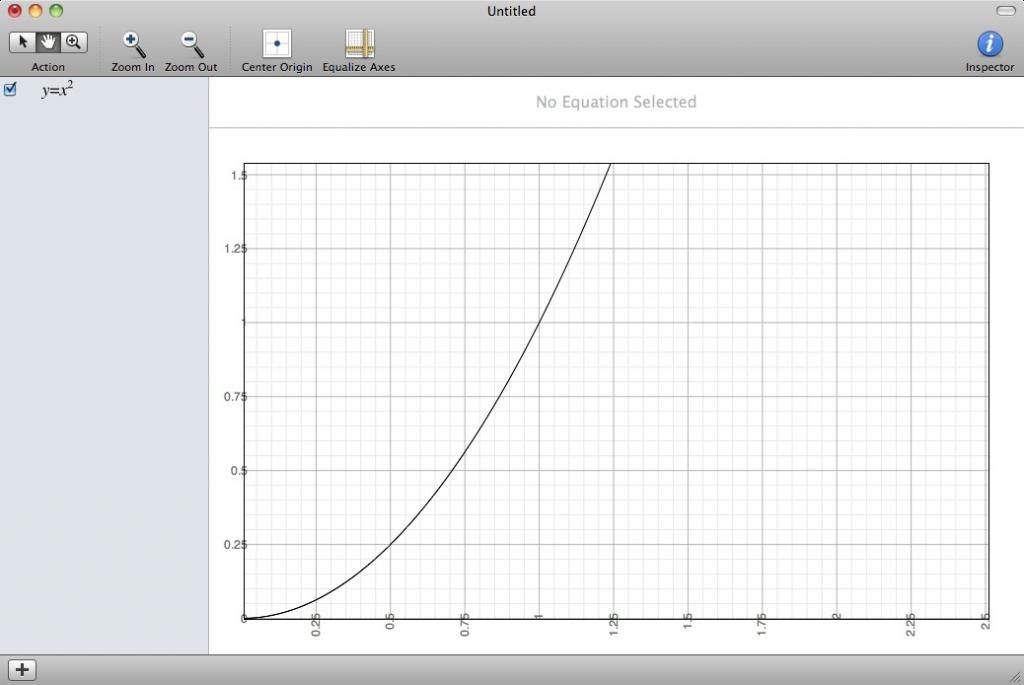
You can see that in the exponential graph, it's not a straight line (aka, not linear), and that's what's happening with that filter % value given in the patch recipe. The Fred Welsh book uses an exponential scale to describe filter frequency percentages. I didn't ask Fred for the formula which he uses to determine filter frequency percentage, but I did compile a table of values from the book that show the relationship between the filter Q and the % number. Here's that table:
10% - 40hz
13% - 50hz
19% - 75hz
26% - 122hz
30% - 165hz
37% - 270hz
39% - 300hz
45% - 450hz
46% - 500hz
49% - 600hz
50% - 630hz
51% - 680hz
53% - 800hz
55% - 900hz
56% - 1khz
58% - 1.1khz
59% - 1.2khz
61% - 1.4khz
62% - 1.5khz
63% - 1.6khz
64% - 1.7khz
65% - 1.8khz
66% - 1.9khz
67% - 2.0khz
69% - 2.4khz
71% - 2.7khz
72% - 2.9khz
73% - 3.1khz
76% - 3.8khz
78% - 4.3khz
80% - 4.9khz
81% - 5.3khz
84% - 6.5khz
86% - 7.9khz
87% - 8.2khz
88% - 8.8khz
89% - 9.4khz
92% - 12khz
100% - 20khz
Someone who is a math wiz could take those values and derive a formula that describes the precise relationship between the percentage and the filter Q in Hz. I'm not a math wiz, so I will skip that! Suffice it to say that 10% doesn't mean 10% of 20,000Hz…. it means something else.
So I just gave you a table, with actual values from the cookbook with the whole filter start-point percentage thing. Looking back at the patch recipe for Cello, it tells us that the filter envelope should affect the filter Q to 90%. The table I provided doesn't have a value for 90%, but it does have values for 89% (9.4kHz) and 92% (12kHz). Does that mean that the filter Q should start at 40hz and rise to something between 9.4-12kHz? Sorry to complicate this even more, but again, the answer isn't that simple.
The patch recipes are written so that we have to take into account that the directions want us to open the filter to 90% of the filter's remaining capacity, while we take into account that it's already open slightly. The best way to wrap your head around that is with a formula that Fred Welsh gave me to figure out how high the filter Q should go in Hz, using that envelope percentage number:
(100% - s%) * a% + s% = ending frequency of filter in %
where...
s= percentage of filter starting frequency
and
a= envelope amount %
Does this look painful yet? It is. It totally is. But I hope you can let your inner geek out and allow yourself to enjoy the math. I certainly do :) I hear girls frequently say they find some nerdiness attractive in a man. So if you're a guy sitting in a bedroom alone somewhere, let that help motivate you to embrace this wonderful side of the art of sound creation!
So back to the good stuff… let's plug in the numbers from the patch into our formula…in the cello patch, s=10, as shown here...
and a= 90, as shown here:
So plugging those values into Fred Welsh's formula looks like this…
(100% - s%) * a% + s% = ending frequency of filter in %
s= 10
a= 90
then
(100%-10%) * 90% + 10% =
(90%) * 90% + 10%=
81% + 10%=
91%
91% is the answer…. Now we can take this number and go back to the table I provided earlier and use it to determine the frequency (in Hz) to which the frequency should open, and it is near 10kHz. So we want our filter to start at 40hz, then open to a maximum of 10,000Hz, and do all this according to the times designated in the envelope (0-seconds for attack, 3.29 seconds for decay, etc.)
So the next big question is, how do I tell Analog to start the filter Q at 40hz and then rise to 10kHz… and here, again, things get complicated. Are you beginning to see why I decided to write this tutorial? Undoubtedly, some catty electronic musicians will chide me for wasting my time in explaining such technical details about a synth that's really simple, and out-of-date, but who cares? The principles and skills I gained are universal, and sharing a love of technical geekness in order to develop a community is freakin' awesome - so to hell with the naysayers! Alright back to business…
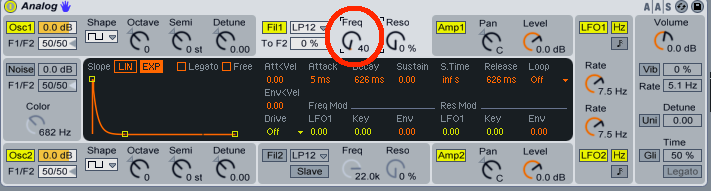
So I need to tell Analog's filter to start at 40Hz and rise to 10kHz. The parameter that tells the filter Q how much it should be modulated by the envelope is under the filter tab, and is located here:
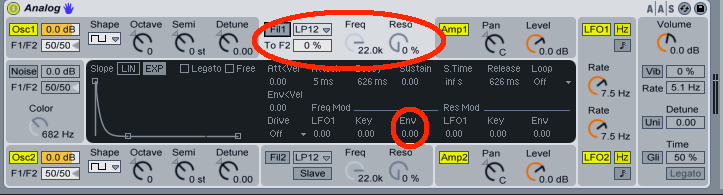
Alright… here's where it gets even more fun… that "Env" amount under "FreqMod" (which is shown circled in red above as the value zero) can be adjusted between -16 and 16. So what the hell good does that do? What does 16 and -16 mean in terms of frequency in Hz? Shoot… the creators of Analog weren't even nice enough to give us a percentage amount from 0-100%, or something like that…. instead they chose -16 to 16. What are we supposed to do with that?!
Fear not my friends - the answers are coming!
Through my amazing powers of deduction (I can explain how I figured this out if you like), I was able to determine that the random 16 thing actually has rhyme and reason to it. And it's kinda complicated so take this chance to pull up your britches and prepare… It goes like this: the 16-based value opens the filter relative to the starting point in the following way: at a value of "1", it will open the filter Q to twice it's starting value. At a value of "2", it will open the filter Q to four times it's starting value, and at a value of "3" it will open the filter Q to eight times it's starting value. Here's a summary:
1 -> 2
2 -> 4
3 -> 8
Does that number sequence look familiar? Congratulations, we hit another exponential function! Just like with the whole filter percentage thing, there is an exponential relationship, and this formula is easy to figure out. If you look at the sequence of numbers, you can quickly see that it's the number two being raised to a power, or something like: 2^(x). If you write out the entire sequence, from 1-16, it would look like this:
x=1 (x2)
x=2 (x4)
x=3 (x8)
x=4 (x16)
x=5 (x32)
x=6 (x64)
x=7 (x128)
x=8 (x256)
x=9 (x512)
x=10 (x1,024)
x=11 (x2,048)
x=12 (x4,096)
x=13 (x8,192)
x=14 (x16,384)
x=15 (x32,768)
x=16 (x65,536)
So here's the thing… if I want the filter to start at 40Hz, and open up to 10kHz, then I have to do a little math to determine the ratio of 40 to 10,000, and then find the number on the table above to which Env depth value to which it correlates. In this case: 10,000/40 = 250, so I want the filter to start at 40Hz and open up to 250x it's original value. According to my chart, the nearest number in my exponential formula is x=8, and that will open the filter up to 256X it's original value… that's not exactly 250, but it's close enough. So I would change that filter "Env" parameter in the "FreqMod" section to "8", and presto! The filter will now start and end where I want it to...
Oh, I should mention that we set the filter's starting point of 40Hz according to the large nob on the face of the filter tab here:
Lastly, the values in FreqMod>Env go from -16 to 16, and if you input a negative value, the filter Q will swing in the opposite direction, and at a value of 1/x… so if I set the start point at 12kHz, with a value of -1 in the Filter envelope amount, then the filter would swing down to 1/2 of the start point (instead of 2X the start point), which is 6kHz. If that's confusing, let me know and I can expand upon it.
So now that we know how to calculate the start and end points of our filter envelope, and we know how to input those minimums and maximums into Analog, all we have to do is set the time data from envelope section into Analog (there's is the issue of the percentage value for the sustain figure of the recipe, but I'm going to disregard that for this tutorial).
The remainder of the recipe is the amplitude section:
That's really a straight forward operation, so let me just demonstrate the filter and the amplitude envelope programming of Analog with a video:
You have reached the end of my first ever tutorial. I hope you found it fun and rewarding. There's more to explore on building WSC patches in Analog. This Cello patch doesn't go into things like pitch modulation with the LFO's, and Analog handles scaling those values in certain ways too, but I will save that for another tutorial.
Thanks again, and if you have any questions or feedback, please feel free to contact me via email.
Cheers!
Andy
This comment has been removed by the author.
ReplyDeleteGreat post! Very clear explanations and good review of the logic and how to do the math. I will say that it worries me that I may buy a cookbook that has to have a whole separate tutorial -- surely that should be in the cookbook! Still, you've done a great job teaching how to think about working on Fred's book, that that is a great service! :-) Please write more stuff explaining Fred's stuff -- I need the help! :-)
ReplyDeleteSorry, late response - haven't been keeping up with this blog. Glad you liked it. I don't think you really need a tutorial to enjoy the cookbook. I just wrote it because I thought it would be fun, and I thought it might help somebody to publish it.
DeleteThis comment has been removed by the author.
ReplyDeleteI had to see if my math skills were still up to snuff. These are not exact but I belive that they are certainly usable.
ReplyDeleteTo convert between percentage and frequency:
pct = 0.145432 * ln (freq) - 0.44152
freq = e ^ ( ( pct + 0.44152 ) / 0.145432 )
Compute the end frequency range in percent as described in the tutorial:
high_pct = ( 100 - low_pct ) * envelope + low_pct
The high_freq can be computed from high_pct with the second formula above.
Once the frequency range of the filter is known, the value for E for Ableton can be computed (its the log base 2):
E = ln ( high_freq / low_freq ) / ln (2)
Does all of this seem correct?
Sorry, late response - haven't been keeping up with this blog. Ooooh.. I love math :) I don't have time to check this right now, but if/when I do - then I will let you know if my answers match up to yours :)
DeleteThanks a lot, mate!
ReplyDeleteYour welcome! :)
DeleteHi there, congrats on your article. I am interested if there is any similar like an cookbook for electribe2. This one is completly empty not presets. Thank you.
ReplyDeleteI don't know of any electribe 2 books, but I don't use those synths right now - so I'm not the best resource for that. I used to have a couple of electribes when they first came out. Great boxes. Fun. I hope you enjoy them and make some great tunes. Feel free to post links with your work. Cheers.
Delete